Canmore's Hardest Multipitch: Don't Rock the Boatswain, 5.14b
- Posted on
- By Miles Adamson
- Posted in Rock Climbing
- 0

A new milestone in the Canmore's Climbing history was achieved yesterday, June 13th 2018. Miles Adamson climbed one of the hardest Canadian multipitch: Don't Rock the Boatswain, 5.14b. This route is located on Grotto Mountain, in Canmore, Alberta.
- FA of P1-P6: Miles Adamson and Zach Watson, September 2017
- FA of P7: Miles Adamson, June 2018
History
Zach Watson and I started bolting Don’t Rock the Boatswain in 2012, and it took 5 years to complete. We didn’t get to put too many days into it each year because I lived in Edmonton and was heading to university in BC, and Zach was going to school out east. In September of 2017, we did the first ascent of the first six pitches. They consist of one 5.11, a 13a, and then four 5.12’s in a row. The final roof we bolted was incredibly difficult. When Zach bolted the last couple meters, he wasn’t sure if what he bolted was possible to climb. We were worried that bolts would need to be moved for the line to go, but still I attempted it last year in September. The moves, I could barely do individually, but I knew the line did go but at least at a solid 5.14 grade. Yesterday, I went up again to attempt the roof, and sent it on my 3rd try of the day, for its first ascent. I’ve proposed a grade of 14b, which puts it among the hardest multi-pitch climbs in Canada.
The route had to be bolted on lead because the top of the cliff was too dangerous to access from the top of Grotto Mountain. Even if you hiked all the way up the back, there are huge scree slopes above the cliff which might slide on someone trying to walk towards the edge. To bolt, we mostly drilled from free stances. This means we literally just held on with the drill to put in bolts. The drill we would put on a sling clipped to a gear loop. The bolts were attached to quickdraws, with the nut tight onto the hanger so they didn’t fall off. To drill, we just took the drill off when we got a good stance and pressed into the rock where we tested was good with a hammer. The bolt would go in finger tight, just enough to stay there. Then it would get hammered in enough to clip it and take. From there, we would adjust the nut to the end of the bolt to finish hammering it in, tightened it with the wrench and it was done. The hardest parts of the route we had to just go bolt to bolt, by putting in one from a take as high as we could.
Challenges
Climbing uncleaned rock with a drill was extremely difficult, as we would often need to bash blocks with a hammer before proceeding. We had a plan of where the anchors would be based on what ledges we could see from the ground, but it was still very exploratory. We were trying to bolt up the many roofs and features in a logical way, connecting the best rock without accidently hitting a totally blank or loose section. At one point bolting the 13a pitch, I had passed the hardest terrain and was on an easier section. I did quite a few moves above my last bolt and got a large jug. Really pumped, I went in direct on it with an aid hook. As I started drilling and pressed into the rock, the force out broke the hold I was hooking on. The hold hit me in the helmet and I fell around 6m with the drill in my hands, onto my last bolt. Thankfully, the route is very steep and the fall was clean, even with the drill in my hands.
The final roof is very much my style, steep compression needing tension on the footholds. It has several moves requiring heel hooks and toe hooks in the roof to avoid foot cuts on the poor handholds. I had attempted it in September when Zach and I had sent the original line, but could barely do the moves. Zach had no interest in projecting the final roof, but I always had the vision to come back eventually. Over the winter I trained a huge amount, not specifically for this but for a bouldering trip. After the trip, I changed gears to route training. Coming back much stronger than before, I sent the roof pitch on my 3rd attempt of the day. The route is now complete, and Zach has already started bolting a new multipitch to the side. The new line appears to be much easier and should turn out to be a great moderate outing.
Don't Rock the what?
A Boatswain is a hanging platform attached to an anchor. We made three wooden ones out of 2x12’s and cord. They are still hanging on the route at the anchors with the most uncomfortable belays.
Approach
Park at the Rat's Net Cave parking area, follow the trail for The Playground/Rat’s Nest Cave for approximately 10 minutes to a fork, on the left, that leads to a powerline. Follow the powerline West, down to where a trail turns right into the forest. Follow this trail and an old road until you reach the drainage below the canyon. Follow the drainage until you reach the route near the base of a ramp angling up and to the right and find the climb, front and center, at the back of the canyon.
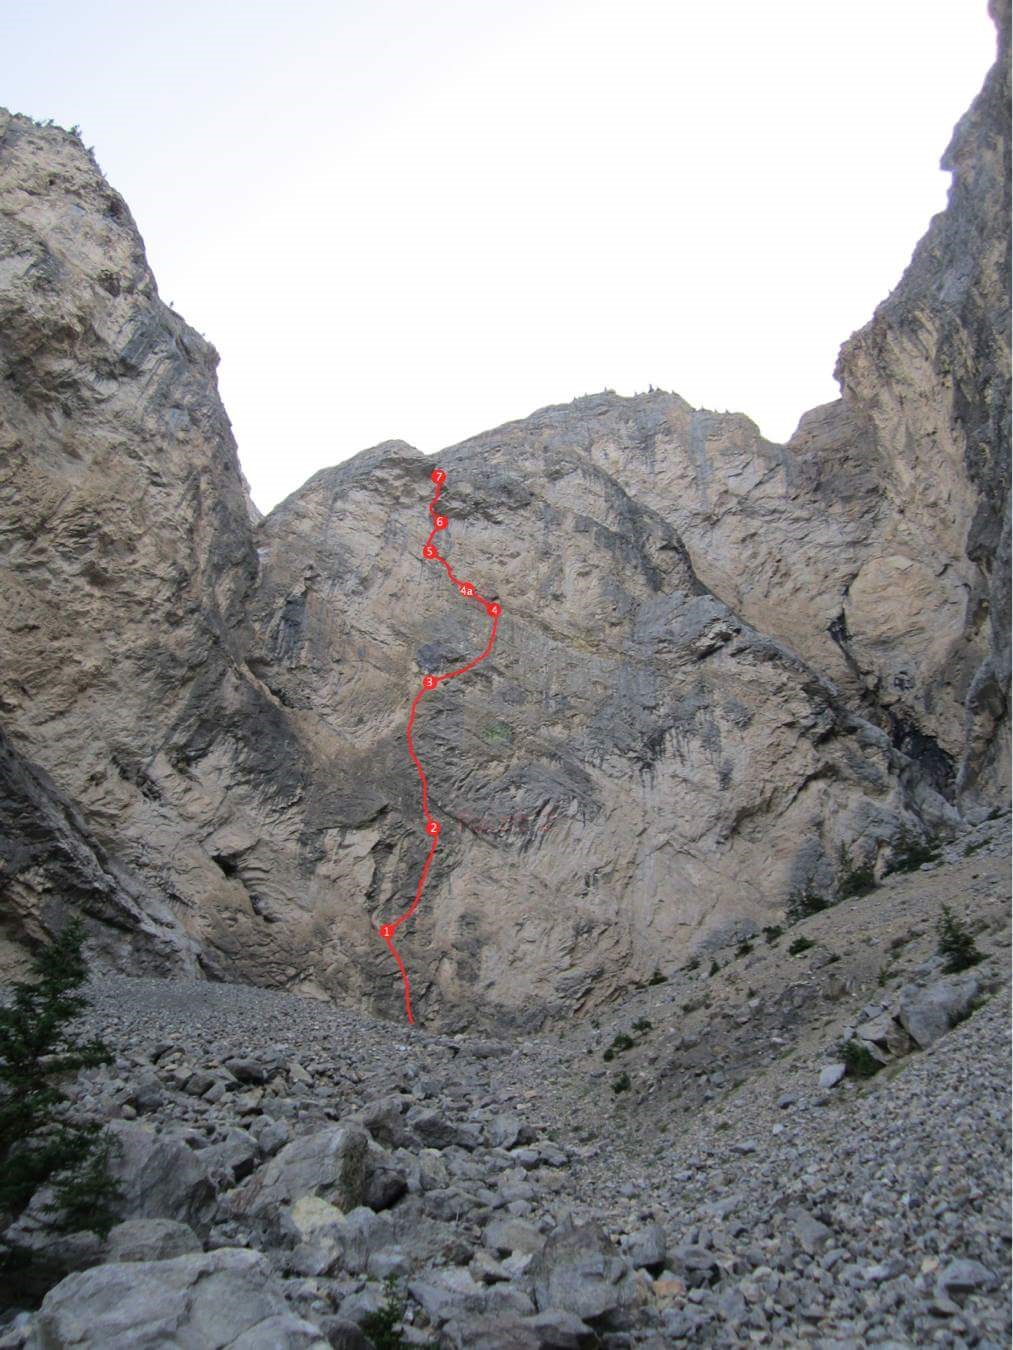
Pitch 1: 11c/R 12 bolts
Attempt to belay this pitch from a protected location like the alcove down and right. Climb through several slabs and a bulge crux. Several moves with bad feet are far above the last bolt and potentially have a fall consequence. Pull a crux after a small roof to a significant run out, leading to a crumbly ledge with the anchor.
Pitch 2: 13a 12 bolts
Climb the massive flake sitting on the ledge to the first bolt, and continue straight up through amazing rock. The roof has a powerful crux. Above, some tricky sequences lead through a corner and to the anchor.
Pitch 3: 12c 19 bolts
Climb up and right of the anchor, somewhat above the belay. Then, immediately left through some cryptic climbing to a beautiful corner and finally a difficult slab. The belay is hanging, perfect for boatswains.
Pitch 4: 12b 13 bolts
Traverse right from the anchor. A large sideways move with poor feet gains you passage past the 2nd bolt. It eases off before another large move, which leads to much easier, but run out terrain above. The 5.10 layback flakes are incredible and lead to the largest ledge on the route. Belay your second from the anchor above the pitch, but traverse left to the anchor on the far side of the ledge to belay the next.
Pitch 5: 12b 9 bolts
Traverse straight left, past a giant block and some hollow sounding flakes. Continue straight up through a short boulder problem that leads to a corner and mantle to the next anchor.
Pitch 6 (Finish of Original Route): 12a 10 bolts
The moves at the first and second bolts are the hardest, the second was stick clipped on the first ascent to avoid hitting the ledge. After, it eases and you gain small anchor ledge just below the imposing roof.
Pitch 7 (aka Don’t Rock the Boatswain Extension): 14b 16 bolts
Traverse left around a sharp arete. Be extremely cautious of your rope tightening on this arete from a fall, extend draws as needed (especially the first 4, which can also be back-cleaned). Move awkwardly into an overhanging corner, and layback it to a good rest. Directly out of the rest, bust out onto the roof with underclings, compression moves and tension. Climb all the way to the lip of the wall past 2 fixed draws and mantle it. Finish by standing on top of the wall. This pitch cannot have an anchor over the lip due to the logistics of the rope tightening over the sharp lip of the wall. To get down, go back to the last fixed draw and lower off of them to clean your gear.
Descent
To rap the route you need two 70m ropes. From the top of the 5th pitch rap all the way to the top of the 3rd. Avoid rappelling from the large ledge (end of pitch 4) as ropes may get stuck or be very hard to pull.
Comments
Be the first to comment...