Ice Climbing Packing List - The Essentials
- Posted on
- By Kurt Morrison
- Posted in Gear, Ice Climbing, Packing List
- 2
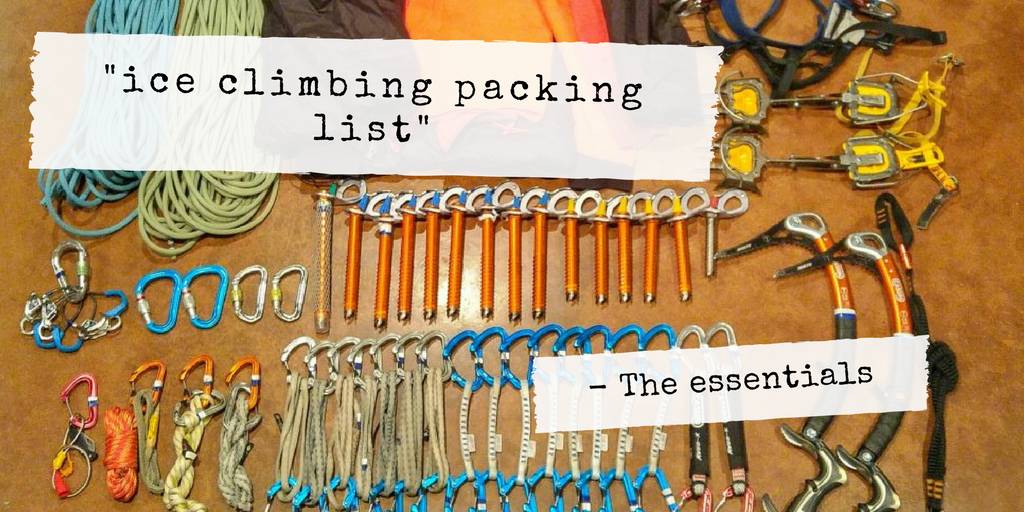
An in-depth ice climbing packing list with gear suggestions, product reviews and a downloadable check list to ensure you have all the essential gear for your next ice climbing adventure. ( 15 minutes read )
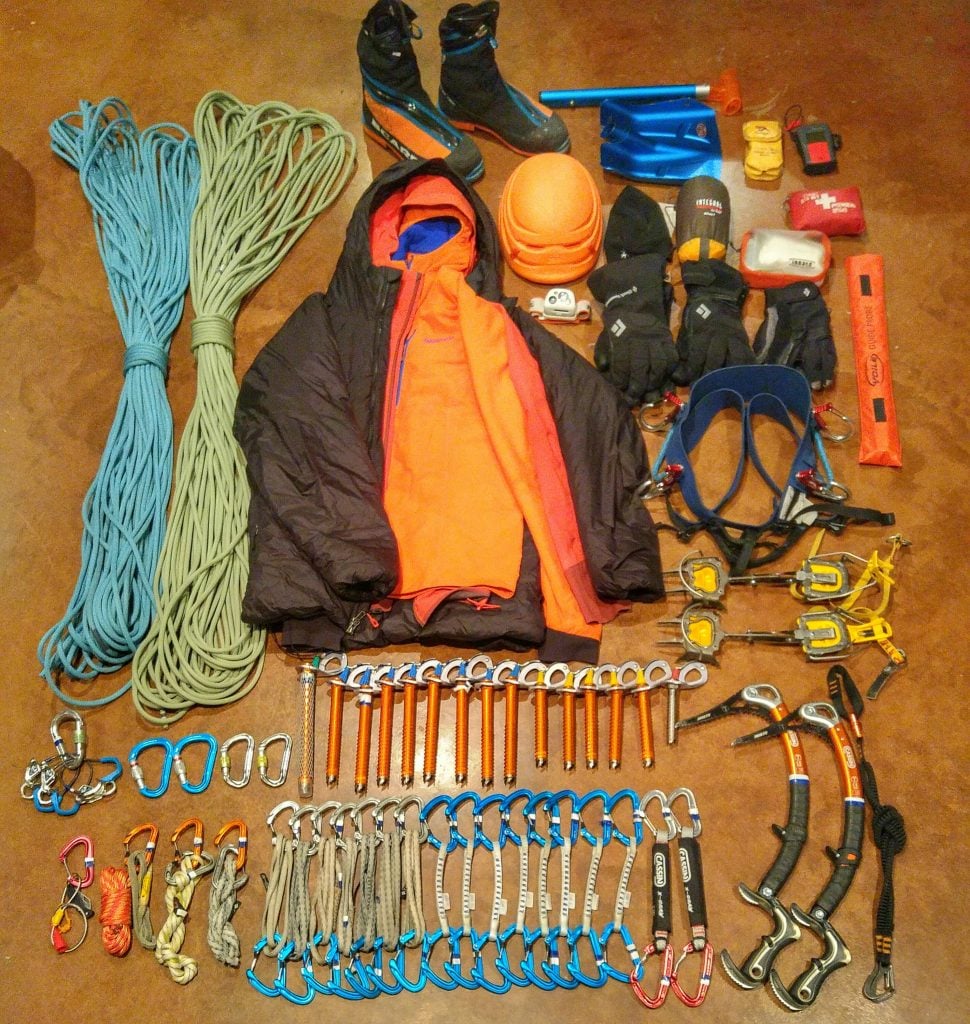
Ice climbing is a very gear-dependent sport. Technical, athletic movements in a harsh, unforgiving environment demand a delicate balance of precision and protection from the elements. Having unsuitable equipment for ice climbing can quickly turn a great day into the mountains into an epic. Below I've listed the ice climbing packing list that I follow every time I'm packing my bag. Please note I have not included ice climbing clothing systems as this is a topic for another post unto itself. Every effort was made to include variances and the rationale for their inclusion.
Ice Climbing Packing List
Mountaineering Boots
Warm, stiff, insulated mountaineering boots are the most essential component of your technical gear, with fit being paramount. They must be voluminous enough so as not to restrict blood flow whilst ensuring your heel remains firmly planted. Make sure your have enough space that you do not bash the front of your toes when kicking.
For general ice climbing consider single leather mountaineering boots such as the Scarpa Mont Blanc or the La Sportiva Nepal Cube GTX. These provide a fine compromise between weight, price, warmth and durability. The fit is considered rather neutral and they are excellent for long approaches on varied terrain.
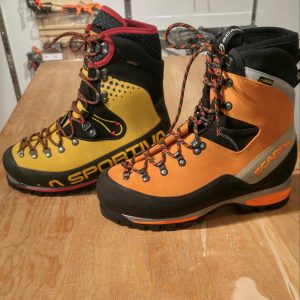
La Sportiva Nepal Cube, Scarpa Mont Blanc GTX
For those who run a little colder, supergaiter boots such as the Scarpa Phantom Tech or the La Sportiva G5 provide additional warmth and element protection by encasing a single leather boot with a waterproof gaiter. This combination allows for a warm, lightweight boot with plenty of mobility. These boots climb and walk fantastically while keeping your toes very warm but are expensive and less durable than a general mountaineering boot.
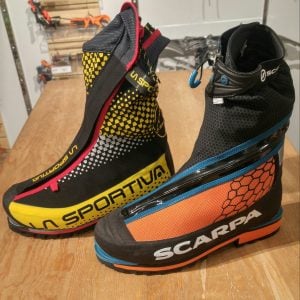
La Sportiva G5, Scarpa Phantom Tech
For the coldest days when you probably shouldn’t be ice climbing, double boots are often the only solution. These feature a removable inner boot and a protective outer for the greatest combination of warmth, albeit usually with a serious weight penalty. While double plastic boots like the Scarpa Inverno have been the standard for a long time, newer boots like the Scarpa Phantom 6000, La Sportiva G2SM, Arcteryx Acrux AR and Mammut Nordwand 2.1 now utilize lightweight materials to create a boot that is barely heavier than a single leather boot. These are generally overkill for most days but anything below -20C and these become a very welcomed option.
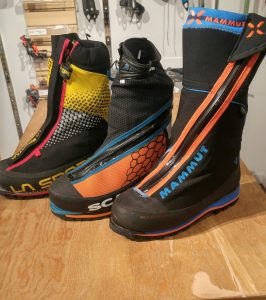
La Sportiva G2SM, Scarpa Phantom 6000, Mammut Nordwand 2.1
Crampons
Your crampons must be purpose-built for ice climbing and fit well to your boots. This means a firm pressure is required to latch the heel lever, minimal space exists between the heel posts and the forefoot of the boot is in complete contact with the front piece of the crampon. While it is possible to use hybrid style crampons, fully automatic are the standard.
The most popular choice for pure waterfall ice climbing is a dual vertical front point configuration. This allows for ample purchase and stability in the widest range of conditions. These can be fixed front pieces as found on the Grivel G22, Cassin Alpinist Pro or Petzl Dart. While they are generally the lightest option, the front points are not replaceable. Dual Points with replaceable front points, such as the Petzl Lynx, Black Diamond Cyborg, Grivel Rambo 4 and G14 or the Cassin Bladerunner allow easy swapping of broken or worn front points but that added hardware ups the weight. Most of these will also allow you to switch to a monopoint configuration.

Cassin Blade Runners, Petzl Lynx, Black Diamond Cyborg
Monopoints are the best option for technical ice, mixed climbing or fragile conditions where the increased surface area of dual points would displace too much ice. These offer a level of precision generally not possible with dual points but sacrifice the stability as there is less metal in contact with the ice. They will also not provide a lot of confidence in chandeliery, aerated ice. Like the dual points, they come in both fixed (such as the Grivel G20 and Petzl Dart) or replaceable (like the Black Diamond Stingers) variations.
Lastly, and often discredited as a mountaineering tool, alpine crampons with horizontal front points offer increased surface area in soft conditions, acting as miniature shovels. While they require an exaggerated heels-down leg swing, with proper use they are less prone to sheering in variable snow and ice conditions. What differentiates this style from the general mountaineering crampons is largely the orientation of the secondary points. Crampons such as the Black Diamond Sabretooth Pro, Petzl Sarken or Cassin Alpinist are designed with aggressively forward facing secondaries to secure foot placements with easy. These often outperform duals or monos in low angle terrain.
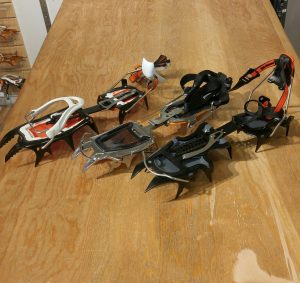
Petzl Sarken, Black Diamond Sabertooth Pro, Cassin Alpinist
Ice Axes
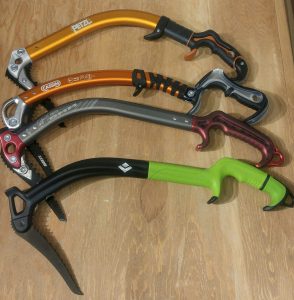
One of the most vehemently debated topics of gear discussion are ice axes. People tend to chose their favorites and argue their merits without reserve. While all tools have their unique pro's and con's, generally speaking, they can be divided into two broad catagories: All-round or alpine ice tools and steep ice tools. While both will work well on a variety of terrain they are each optimized to excel under certain conditions.
All-round or alpine ice tools can be characterized by having a slightly bent shaft, moderate pick angle and a plunge-able spike. It is not uncommon to see tools of this sort equipped with one hammer and one adze attachment but for pure waterfall ice it is preferable to remove the adze for safety reasons. These make for an excellent tool for beginners and advanced climbers alike and the moderate pick angle make them ideal for lower angled terrain. It should be noted that because these tools have a smaller pommel and a less economical grip they pose a challenge on very steep terrain. Popular options include the Petzl Quark, Cassin X-All Mountain, Black Diamond Viper or Cobra and the DMM Apex.
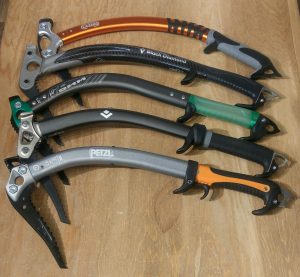
| Top To Bottom: Cassin X-All Mountain, Black Diamond Cobra, DMM Apex, Black Diamond Viper, Petzl Quark |
Steep ice or mixed climbing tools differ by having a steeper pick angle and generally an offset grip, optimizing the position for steep to overhanging terrain. They offer a variety of grips for switching hand positions and are the ideal choice for complicated terrain. These usually remove a plunge-able spike from the bottom because that same widened pommel that allows for a more comfortable resting position also increases the difficulty of plunging. Additionally, the steeper pick angle is designed to penetrate the ice with a snap of the wrist while the handle is close to the ice. This makes moderate terrain more difficult to gain purchase. In recent years the Cassin X-Dream has grown exceedingly popular but other excellent options include the Petzl Nomic, Grivel Tech Machine, DMM Switch and Black Diamond Fuel.
Top to Bottom: Petzl Ergo, Cassin X-Dream, DMM Switch, Black Diamond Fuel
Giving these distinctions, does this mean you have to have two different two different tools? Of course not. People have soloed harder ice than most of us will ever climb on far worse tools than our modern options. just know that some are optimized for certain conditions and choose accordingly. Leashes have also fell by the wayside as modern tools have made it easier to hang on for long periods of time. However, sometimes it is handy to have umbilicals to prevent your from dropping a tool, other times they can prove to be a hindrance. As a rule, I only used umbilicals when dropping a tool would prove catastrophic.
Helmet
A non-negotiable. You must wear a helmet certified for climbing. There is no ice specific helmet and a if you already have a rock climbing helmet it will suffice. As there is often pieces of falling ice, a hardshell style helmet like the Petzl Elios or Black Diamond Half Dome are excellent choices. Others prefer lighter styles like the Petzl Sirrocco or the Black Diamond Vapor. Ensure it is sized appropriately to fit over a hood or hat. You should be able to see the front of your helmet when you look upwards and it should not move about when you shake your head front-to-back or side-to-side.
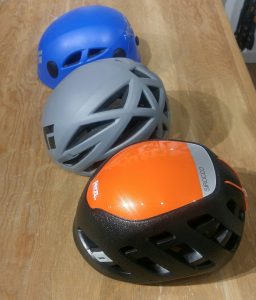
| Top to Bottom: Black Diamond Half Dome, Black Diamond Vapor, Petzl Sirocco |
Harness and Ice Clippers
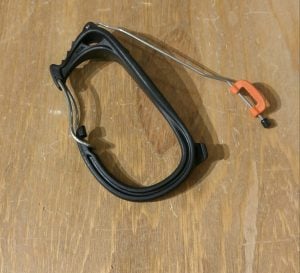
Where a rock climbing harness and an ice/alpine climbing harness differ lies in the construction and the inclusion of ice clipper slots. Modern harnesses designed specifically for winter use will use materials such as dyneema or spectra to reduce weight and prevent water absorption. While these are certainly nice enhancements they are not mandatory for ice climbing and a rock climbing harness will suffice. However, having the small loops built into the harness to allow for ice clippers is very handy. This allows for easy access to screws, both for placing and racking. The new Petzl Caritool clippers allow the user to place them anywhere on the harness, essentially nullifying the need.
Petzl Caritool Evo
For specific harnesses, the Petzl Sitta, Arcteryx AR395 and Black Diamond Aspect are great choices. And for those seeking the Rolls Royce of ice clippers, the DMM Vault's are nearly unbreakable.
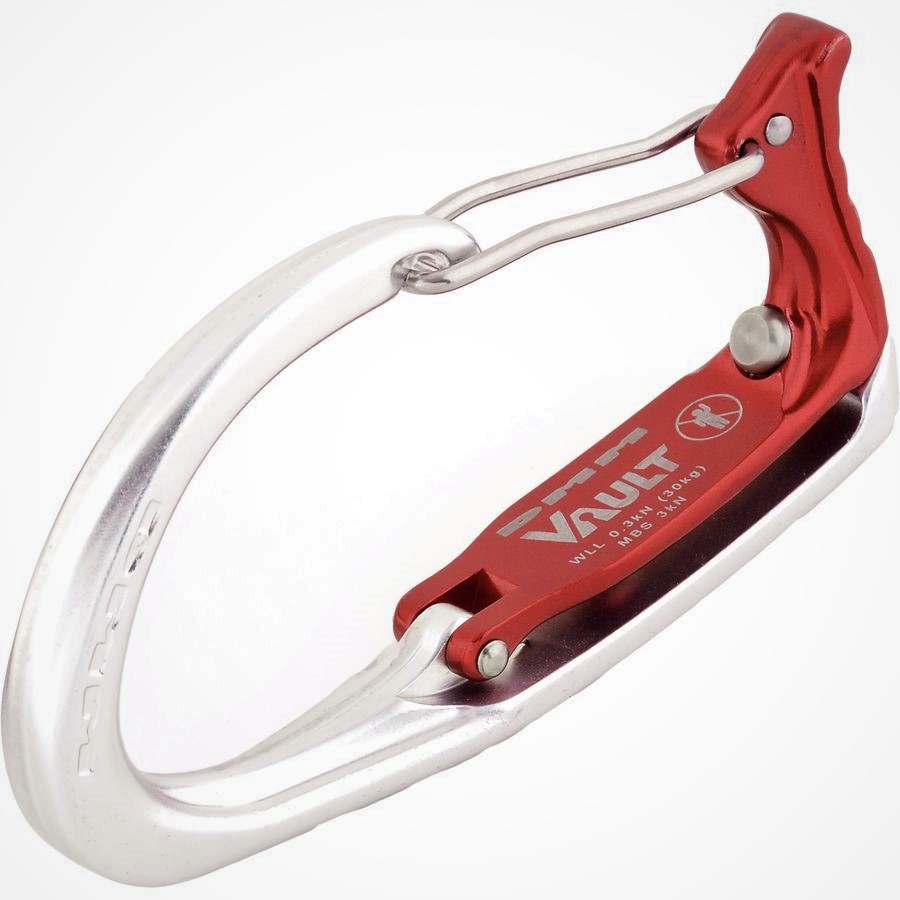
DMM Vault
Backpack
All of your gear should stow nicely inside a 30-40L backpack. When selecting a pack, light is right. Avoid bags that feature excessive frills, fancy attachments or heavy frames. Packs like the Patagonia Ascensionist or the Arcteryx Alpha FL are essentially one compartment a cinch top and a light foam back from. It is important to have ice tool attachment points on the exterior and potentially a means of attaching crampons. Climber-specific packs will be sized shorter so as not to block access to gear loops on your harness and not ride up and impede your swing. Make sure your pack weighs less than three pounds unloaded. If you’re rappelling the route you could also bring a small summit pack. This only needs to carry your belay jacket, spare gloves, a thermos and your headlamp. It need not be any larger than 20L and should roll down to very small and fit inside your larger pack.
Belay Device, Locking Carabiners, Anchor Material
At the very least, each climber requires their own tube style belay device with locking carabiner and a spare locker. If embarking on a multipitch climb the gear requirements for carabiners and anchor material are similar to the that of multipitch rock climbing (read more about that here: Essential Gear For Multipitch Climbing). You'll need a few extra locking carabiners, slings for anchor building or creating a personal tether, a personal prusik or Sterling Hollowblock and a 5m bundle of cordelette (minimum 9-10kN strength).

Personal Bail Kit
Every ice climber should have the knowledge and the means to create a safe anchor in an expedient fashion with minimal gear. Usually this means creating a V-thread or Abalokov. The gear required for this is a 21cm ice screw, an Abalahook and a short length of cord meeting the minimum standard of 10kN. This usually means 7mm cord and requires either 1.2m of precut cordage or a small knife to cut a segment off your cordelette bundle (you do carry one, right?).
21cm Petzl Laser Light screw, v-threader, 1.2m of 7mm tat, Petzl Spatha knife
If you're not comfortable making a V-thread, seek professional instruction from an ACMG certified Alpine or Mountain guide to make sure you're perfectly clear on the subtle nuances of this essential skill.
Ice Screws and Draws
The number of ice screws required for any route is dictated by the nature of the pitches and your own personal comfort. Bring along enough to feel adequately protected while not impeding your climbing with excessive weight. Generally speaking, 10-12 screws should be enough. Bring more if its cold and you're climbing slowly, bring less if the ice is sticky and and you're most confident with your climbing. Bring four extra if you're building gear anchors (two per station) and maybe bring less if you're climbing a slot canyon with bolts and short pitches.
Note: I don't include my mandatory 21cm screw and optional stubbies (10cm) in this count.
In regards to length selection, the holding power is the same for 13cm screws and 21cm screws provided the threads are in the same contact with the same ice. This is due to the length of the threads being equal. For this reason, I tend to include more 13cm screws for expediency of placement and a reduction in weight. Longer 16cm screws become valuable when the good ice is buried under a layer of crude or when building anchors. And while expensive, the Petzl Laser Speed Light are worth every penny.
In regards to draws, you'll need a mix of quickdraws and alpine draws and maybe a few more than the number of screws packed. The distribution of each should be dictated by the nature of the route. Straight forward routes will probably only required quickdraws but funky, featured or wandering routes will necessitate alpine draws and occasionally double length slings.
If you already have a rack of draws for sport or trad climbing I won't try to convince you that you have to purchase a set allocated specifically for ice climbing. However, if one were to ask, the perfect draw for ice climbing is lightweight, easy to manipulate with gloves, long enough to maintain a good rope line if clipped in a hole and wiregate to prevent freezing. However most importantly to me is having a clean, notchless nose on the carabiner to prevent snagging on jacket hemlines. In my humble opinion the three carabiners that have best exemplified these criteria at the Petzl Ange, DMM Chimera and Wild Country Helium. This biner selection applies to both draws and alpines.
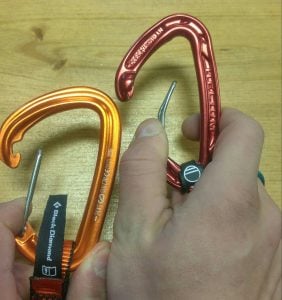
| Left: Black Diamond Freewire Right: Wild Country Helium. Note the notch in the carabiner by the nose. |
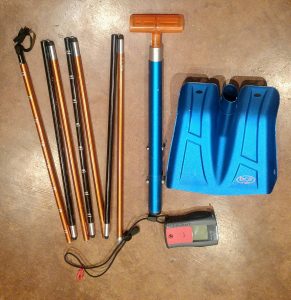
Avalanche Gear
Often neglected but quickly and rightly so becoming more popular, certain routes demand appropriate avalanche gear, either on the approach, on route or both. If faced with complex terrain and an unfavorable bulletin, ensure that all parties have a beacon, shovel and probe and know how to use them. Weight is certainly a concern and you will appreciate a lighter option. A shorter probe like the BCA Stealth 240 works well and a small shovel such as the Mammut Alugator Light are a great combination. Many ice climbers like the Peips Micro but any beacon works, just make sure you're familiar with yours and well trained in companion rescue. Beacons must be checked when leaving the vehicle to ensure each one is on and the shovel and probe can be stashed on the sides of your pack’s interior. Make sure they're stored within your bag.

Headlamp
During short winter days we will regularly begin and end a day of ice climbing in the dark. Make sure you have a bright, reliable headlamp. I prefer a USB rechargeable model like the Petzl Reactik because I never have to doubt the remaining life in my batteries. Cheaper option are the Petzl Tikka or Tikkina, which are powered by AAA batteries (make sure you have a few spares packed). These offer great illumination for an excellent price. Because light is so important, I always keep a tiny 27g Petzl E-Lite+ in my first aid kit as a backup.
First Aid Kit, Guide’s Tarp, Emergency Communication Device
Most ice climbing locales are in remote, rugged landscapes demanding self sufficiency. It is imperative that your group have the means to address minor medical concerns and manage serious incidents. A well stocked first aid kit for ice climbing should have the means to stop bleeding, splint a broken bone, manage pain, package a victim to keep them warm and prepare for transport and communicate with outside help. A the very least you should have a collection of gauze and bandages, steristrips, medical tape, a small blister kit, pain medication and a way to improvise a splint. Sam or C splints work well but with proper training you should be able to improvise with equipment you already have. A silicone impregnated nylon tarp give you a way to create shelter, make a rescue sled or wrap someone up to keep them warm. A small space blanket helps also.
One of the most crucial items to have is a fully charged cell phone. While the temptation always exists to use your phone as a camera, make sure you have enough battery life in case you need to call for help. And should you be outside cell reception, a personal locator beacon or satellite phone can be a literal life saver. The best options, like the Garmin InReach offer two-way communication but the value of a Spot or Fastfind Ranger can not be overstated.


Repair Kit
A small repair kit specific to your gear is handy. Keep this streamlined and minimal. A spare toe bail, allen keys for your tools and crampons and a small roll of duct tape is probably enough for most problems you'll encounter. Most of these parts can be stowed inside your first aid kit. Avoid carrying a heavy Leatherman or multi-tool and a vast assortment of spare parts. If you break a pick on an ice climbing day trip you're probably going to accept that fact, rappel and go home.
Food and Water
To keep your metabolic furnace adequately stoked, make sure you regularly consume high calories food throughout the day. Take what you would normally eat for a day of rock climbing and double it. Then add enough calories to fuel you for an emergency walk. Consider choosing food that doesn’t freeze like nuts and hard candies and keep a few bars or snacks in your pocket, close to your body heat, for quick access.
Bring enough water to make sure you're staying hydrated. Hydration packs typically don't work well as the hose tends to freeze almost immediately. Insulating a water bottle with bubble wrap works really well. On particularly cold days a small thermos of tea is a welcomed reprieve, particularly when used as a delivery system for copious amounts of added sugar.
Personal Supplies
A small roll of toilet paper and lighter inside a sealed ziplock bag, contact lenses or glasses if you need them, any personal medications you may require. If you're bringing a camera bear in mind that the cold zaps battery life quickly. Bring spare batteries or keep your camera or phone close to your body for warmth. And even though the days seem short and the sun doesn't feel as intense, make sure you're protecting yourself with sunscreen, lip chap and sunglasses. Keep these near the top of your bag or in your pocket so you don't forget to use them.
Clothing and Glove Systems
The intricacies of clothing and gloves systems extend far beyond the reach of this simple list, warranting a post unto itself. However, simply summarized we must ensure we're wearing an "action suit" capable of regulating body temperature and moisture at a level of moderate exertion, insulation to facilitate moisture transfer, layers to provide element protection and a belay jacket to dry the layers underneath and retain maximum warmth. A full post can be expected on this topic shortly.
Gloves are also highly dependent on conditions and climbers will take anywhere from two to five pairs of varying thicknesses. Some will be thin and dexterous for leading and warm weather while others will be thicker for cold conditions, seconding or rappelling.
<
Ice Climbing Packing List
- Mountaineering Boots
- Technical Crampons
- Ice Tools
- Climbing Helmet
- Climbing Harness with Ice Clippers
- 30-40L Backpack
- Belay Device and Locking Carabiner
- Spare Locking Carabiner
- Personal Climbing Equipment: Cordelette, Prussik, Anchor Material
- 21cm Ice Screw, V-Threader, Small Knife, Spare 7mm Tat
- Ice Screws and Draws (dictated by route)
- Avalanche Gear (if needed): Beacon, Shovel, Probe
- Headlamp
- First Aid Kit
- Guide's Tarp
- Communication Device
- Small Repair Kit
- Food and Water
- Toilet Paper and Lighter
- Sunscreen, Sunglasses, Lip Chap
- Clothing and Gloves (not covered in this post)
Hello Carissa,
Your best bet would be to contact Yamnuska Adventrures. They have very good climbing guides. You can ask for Sean Isaac or Grant Meekins.
If you want to rent gear, Gear Up is the place to go.
Have fun!
Great easy read! Thanks for compiling this list. I'm an avid outdoorswoman with ZERO ice climbing experience. I'm headed to Ouray for my first weekend ice climbing and I'm stoked. I was so excited to read this and find that I had properly prepared. Thanks for the information and great pictures! Happy climbing